(Re)setting up my home Raspberry PI cluster - part 1
25 Dec 2024Introduction
A while back I was working on setting up 3 RPIs based on this guide. Back then I was too excited to play around with new hardware and set up everything as soon as possible. I did not really account for the fact stuff might break and there is no real way to restore it. Of course, I could have followed the same guide from scratch, but how many times would I have to repeat the same process? Dreading this process, I have set this project on a shelf.
In my day job just like any good SRE engineer, I am guided by DevOps principles of having repeatable processes. That’s why the tools like Terraform, CloudCDK, Packer and Ansible are so popular and relevant right now in my opinion.
So I thought that this holiday season, I will slow down the process a bit and re-assemble my cluster and configure a proper process around it.
It is worth noting that this project is heavily influenced by the original guide I have used initially. Usage of Ansible for this project is inspired by www.ansiblefordevops.com and other Jeff Geerling projects.
What do we have?
- 3 Rapsberry Pis 4B model
- 3 PoE hats
- Uctronics Complete Enclosure for Raspberry Pi Clusters
- 2 8cm cooling fans
- Netgear GS305P unmanaged switch
- 3 Ethernet cables
- A few old USB 3.0 and C cables
What is the end goal?
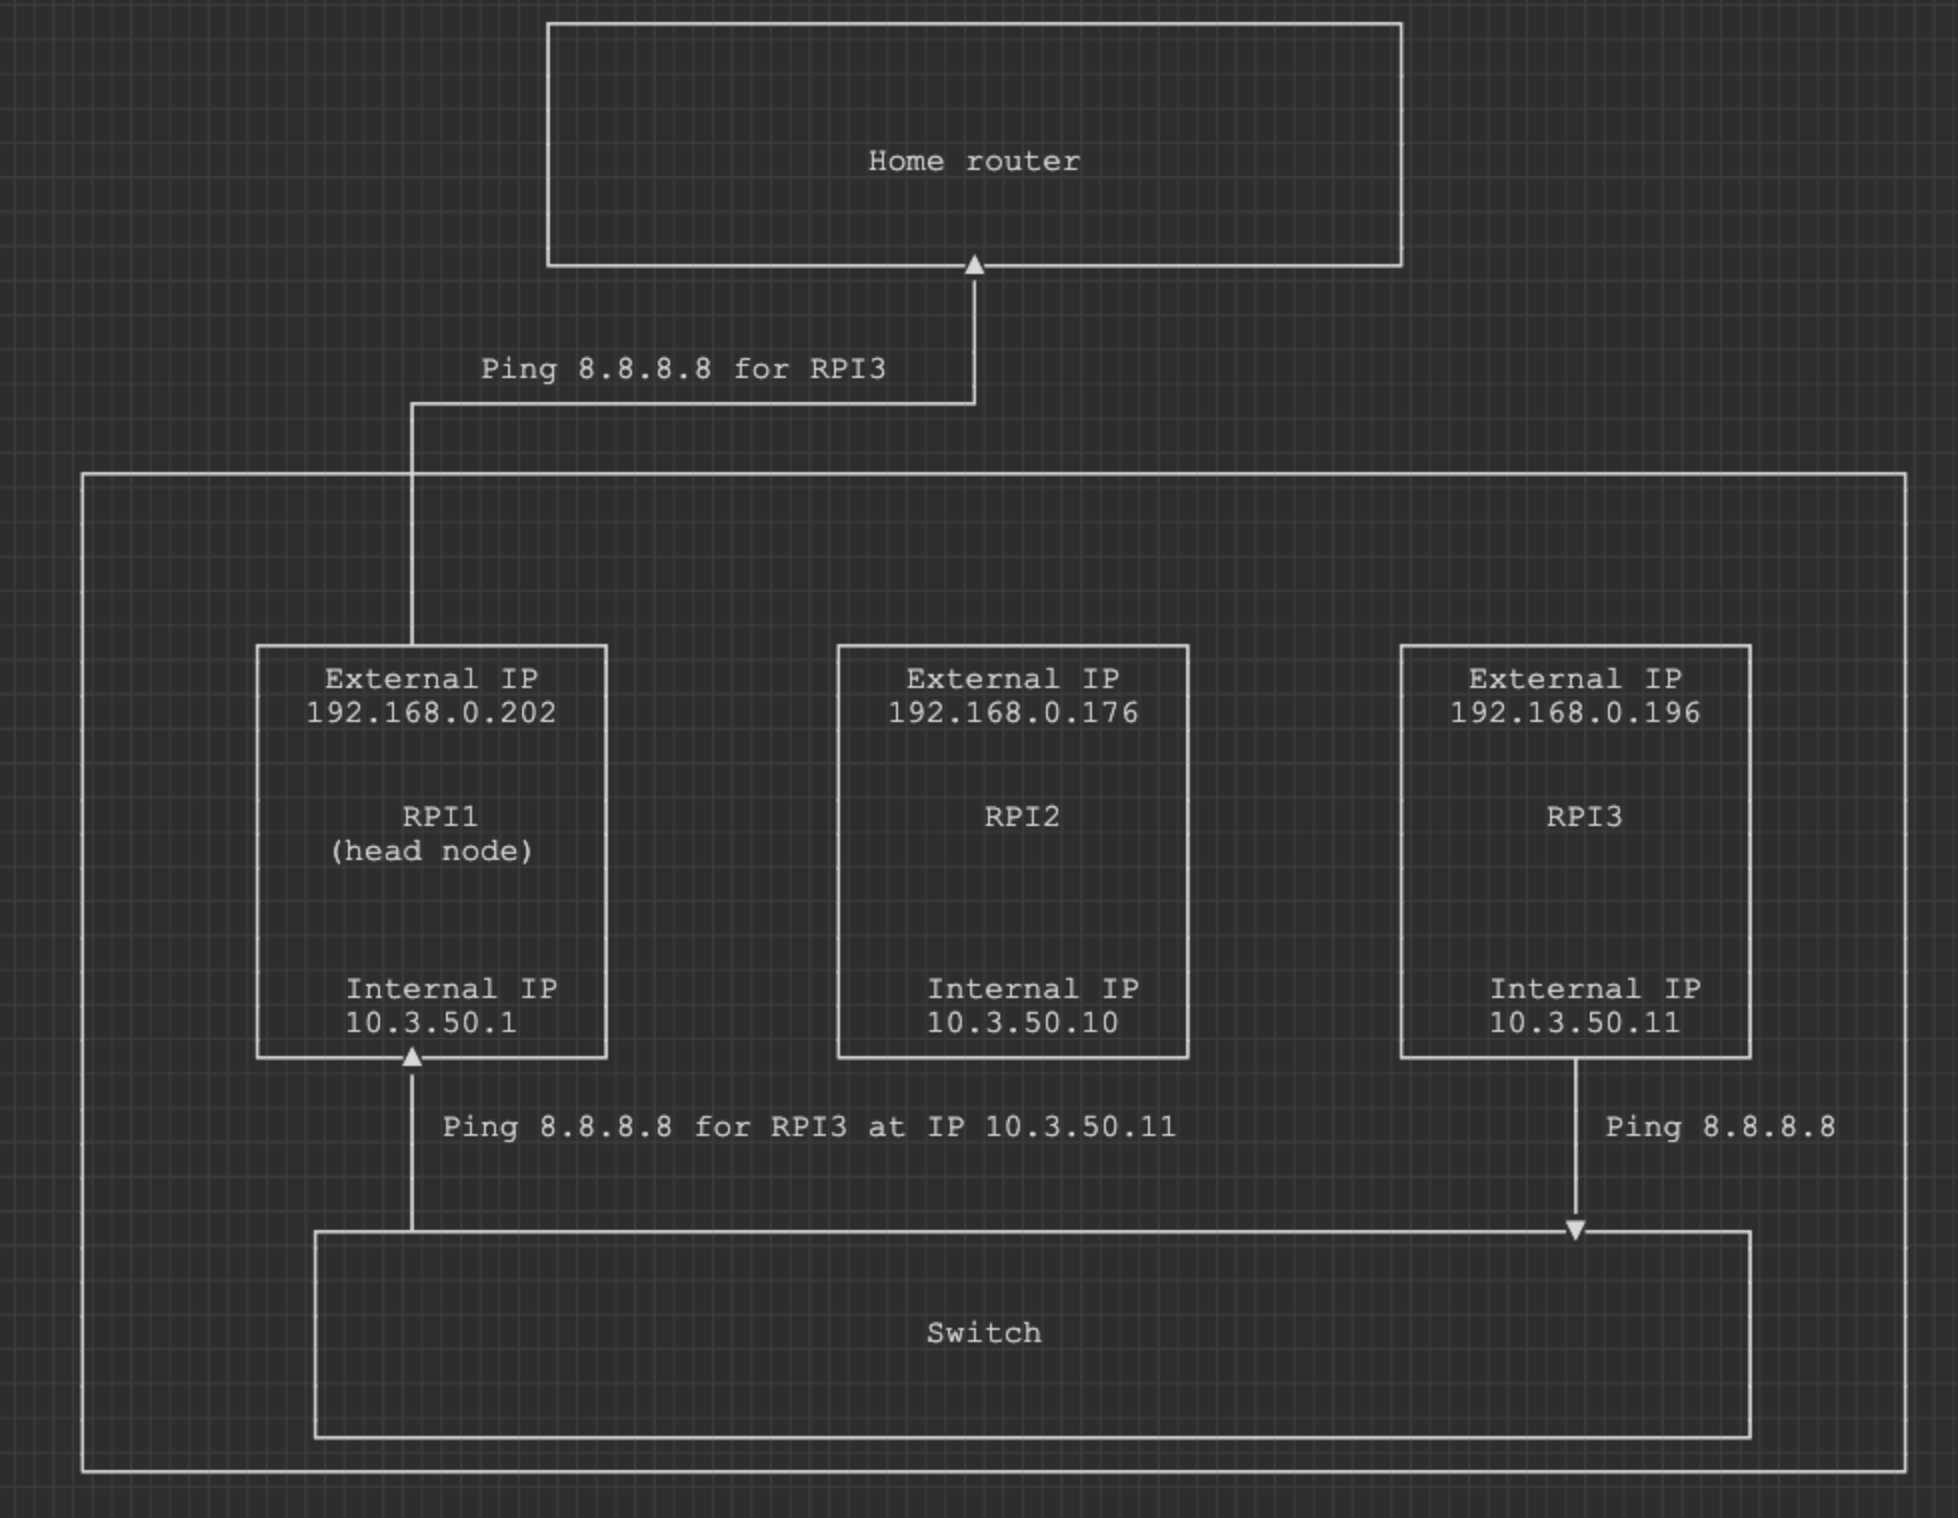
The idea is to have one RPI(we will call it a head node until a proper name is given) acting as a router and hosting DHCP server. Other RPIs would get IPs in a dedicated subnet and communicate with the outside world through the head node. I still want to preserve the possibility of connecting to nodes using their home network IPs. This way I can preserve access if I break the head node.
Fans set up
The last time I was setting up this cluster, I cut some corners because I did not have a soldering station, but this time I ready to set thing right. Two fans came with standard pin connector. It is not an option to use GPIO to power them up as PoE hat will take all the pins. I have used some of my old USB cables and got a pair of USB powered fans.

Switch with PoE
 This allowed for a “clean” looking setup without extra power cables and power sources.
RPIs setup
The setup is fairly straightforward. PoE hats were mounted on the top of GPIO pins.

For this project, I have decided to use Raspberry Pi OS Lite as I am planning to have a Kubernetes cluster here later on.
So it was very convenient to use Raspberry PI Imager to configure WLAN access and hostnames.
Node naming
Hostnames I have decided to use are Caspar, Balthasar and Melchior. These are also known as Magi from the Gospel of Matthew, but I have chosen these names after 3 computers (also collectively referred to as MAGI) in the anime series Evangelion.

Booting up the first node
 As soon as a SD card was installed and Ethernet cable is connected, the head node - Caspar was booting up.
Now, to connect to Caspar, we need its IP first. As I have managed to forget the admin password from my router, I had to brush up on my ARP knowledge using the useful arp-scan utility:
$ sudo arp-scan --interface=en0 192.168.0.0/24
Password:
Interface: en0, type: EN10MB, MAC: <REDACTED>, IPv4: 192.168.0.249
Starting arp-scan 1.10.0 with 256 hosts (https://github.com/royhills/arp-scan)
192.168.0.1	50:91:e3:b9:80:8c	(Unknown)
192.168.0.90	12:b4:c6:3a:3d:44	(Unknown: locally administered)
192.168.0.121	8e:f6:38:a3:fa:53	(Unknown: locally administered)
192.168.0.177	26:41:24:e0:3b:b7	(Unknown: locally administered)
192.168.0.202	e4:5f:01:fc:a9:94	Raspberry Pi Trading Ltd

526 packets received by filter, 0 packets dropped by kernel
Ending arp-scan 1.10.0: 256 hosts scanned in 1.833 seconds (139.66 hosts/sec). 4 responded
Knowing Caspar’s Ip, we can test out some Ansible.
For this, I have created inventory.ini with the following content:
[magi]
192.168.0.202
Using this file, we can get free memory on the device using the following command:
$ ansible magi -a "free -h" -u pi

192.168.0.202 | CHANGED | rc=0 >>
               total        used        free      shared  buff/cache   available
Mem:           3.7Gi       174Mi       3.5Gi       1.2Mi       139Mi       3.5Gi
Swap:          511Mi          0B       511Mi
Okay, now that we know that Caspar is live and kicking, we start implementing its router capabilities.
DHCP setup
We will use a playbook to set up DHCP server which we will call dhcp-setup-playbook.yaml.
First, we want to run apt-get update and apt-get upgrade -y on our system to make sure that we stay up to date. For this will add the following content into this notebook:
- name: DHCP setup
  hosts: magi[0] #we want to run this playbook only on Caspar
  become: yes #at least most of the commands will require superuser access
  tasks:
    - name: Update the package list
      apt:
        update_cache: yes

    - name: Upgrade all packages
      apt:
        upgrade: dist
Currently, eth0 is disconnected, but it has a connection available. Its status can be checked through ifconfig or nmcli.
eth0: disconnected
        "eth0"
        1 connection available
        ethernet (bcmgenet), e4:5f:01:fc:a9:93, hw, mtu 1500
We need to add a few tasks to connect eth0:
- name: Check if eth0 is disconnected
  ansible.builtin.shell:
    cmd: "nmcli device status | grep -E '^eth0' | awk '{print $3}'"
  register: eth0_status
  failed_when: eth0_status.rc != 0 and 'eth0' not in eth0_status.stdout

- name: Debug the status of eth0
  debug:
    msg: "Interface eth0 is currently "
This would allow us to check the status of eth0. We don’t want to reconfigure it if eth0 is already connected.
Then based on the guide let’s modify the connection and restart it only if it is in status disconnected or connecting(about this status I have learnt accidentally, when I have wiped Caspar clean to test out all my playbooks from scratch. It seems to appear when the system is loading and interfaces trying to figure out their status).
    - name: Configure Wired connection 1 with static IP
      when: eth0_status.stdout in ["disconnected", "connecting"]
      ansible.builtin.command:
        cmd: nmcli con mod "Wired connection 1" ipv4.addresses  ipv4.method manual

    - name: Bring Wired connection 1 down
      when: eth0_status.stdout in ["disconnected", "connecting"]
      ansible.builtin.command:
        cmd: nmcli con down "Wired connection 1"

    - name: Bring Wired connection 1 up
      when: eth0_status.stdout in ["disconnected", "connecting"]
      ansible.builtin.command:
        cmd: nmcli con up "Wired connection 1"
Now that eth0 will appear connected after a single run of the playbook(ansible-playbook dhcp-setup-playbook.yaml -u pi).
$ nmcli
...
eth0: connected to Wired connection 1
        "eth0"
        ethernet (bcmgenet), E4:5F:01:FC:A9:93, hw, mtu 1500
        inet4 10.3.50.1/32
        route4 10.3.50.0/24 metric 0
        inet6 fe80::67a:8941:9ec7:7ddd/64
        route6 fe80::/64 metric 1024
...
If we re-run this playbook, you will see that some steps are skipped because of when statements validating eth0_status.stdout in ["disconnected", "connecting"].
Also, we don’t want to hardcode too much information in a variable file, so let’s grap MAC address and save it for future use.
    - name: Extract the MAC address of eth0
      ansible.builtin.set_fact:
        eth0_mac: "{ { ansible_facts['eth0']['macaddress'] } }" #nevermind this awkward space between the brackets. otherwise it would not render correctly
Next, we need a DHCP server.
    - name: Install DHCP server
      apt:
        name: isc-dhcp-server
In the heart of this dhcp server lies a config file(/etc/dhcp/dhcpd.conf) that we need to create.
We will template this file using the saved earlier MAC address of eth0 and some input variables that namely are:
---
main_node_static_ip: 10.3.50.1
cluster_subnet: 10.3.50.0
cluster_broadcast: 10.3.50.255
cluster_subnet_netmask: 255.255.255.0
cluster_subnet_starting_ip: 10.3.50.10
cluster_subnet_ending_ip: 10.3.50.20
non_cluster_subnet: 192.168.0.0
non_cluster_netmask: 255.255.255.0
These variables are stored locally in group_vars/all.yaml on my machine.
Below you can find a template for /etc/dhcp/dhcpd.conf stored as templates/dhcpd.conf on my machine.
#once again nevermind this awkward space between the brackets. otherwise it would not render correctly
ddns-update-style none;
authoritative;
log-facility local7;

# No service will be given on this subnet
subnet { { non_cluster_subnet } } netmask { { non_cluster_netmask } } {
}

# The internal cluster network
group {
   option broadcast-address { { cluster_broadcast } };
   option routers { { main_node_static_ip } };
   default-lease-time 600;
   max-lease-time 7200;
   option domain-name "cluster";
   option domain-name-servers 8.8.8.8, 8.8.4.4;
   subnet { { cluster_subnet } } netmask { { cluster_subnet_netmask } } {
      # this is important as DHCP server will issue IPs sequally. So these two values help to set a predictable range
      range { { cluster_subnet_starting_ip } } { { cluster_subnet_ending_ip } };

      # Head Node
      host cluster {
         hardware ethernet { { eth0_mac } };
         fixed-address { { main_node_static_ip } };
      }

   }
}
This template will be rendered by the following task:
    - name: Create /etc/dhcp/dhcpd.conf
      ansible.builtin.template:
        src: dhcpd.conf
        dest: /etc/dhcp/dhcpd.conf
        owner: root
        group: root
        mode: 0644
We also need to let DHCP server know about the config file and make some changes to /etc/hosts
    - name: Configure /etc/default/isc-dhcp-server
      ansible.builtin.copy:
        content: |
          DHCPDv4_CONF=/etc/dhcp/dhcpd.conf
          DHCPDv4_PID=/var/run/dhcpd.pid
          INTERFACESv4="eth0"
        dest: /etc/default/isc-dhcp-server
        owner: root
        group: root
        mode: '0644'

    - name: Configure /etc/hosts
      ansible.builtin.copy:
        content: |
          127.0.0.1	localhost
          ::1		localhost ip6-localhost ip6-loopback
          ff02::1		ip6-allnodes
          ff02::2		ip6-allrouters

          127.0.1.1	caspar
          127.0.1.1	cluster

          10.3.50.1	cluster
        dest: /etc/hosts
        owner: root
        group: root
        mode: '0644'
At this point, the guide points to node reboot, so all settings are set into place. I have done it manually, as was not sure if I want this part of my playbooks.
Once Caspar is up we can check a lease list using dhcp-lease-list command. As I have unmanaged switch(it does not get itself an IP), I got an empty list. So we need to wait for a second node - Balthasar to boot up.
Routing
Before booting Balthasar, we also need to make sure that the routing part works correctly as DHCP server only provides us with a subnet and IPs.
We do this by creating a separate playbook (mainly for simplicity of debugging) called nat-setup-playbook.yaml.
First, we need to enable NAT capabilities by setting ip_forward option to 1.
- name: NAT setup
  hosts: magi[0]
  become: yes
  tasks:
    - name: Gather facts
      ansible.builtin.setup:

    - name: Configure IP forward
      ansible.builtin.lineinfile:
        path: /etc/sysctl.conf
        line: 'net.ipv4.ip_forward=1'
        state: present
Then we install iptables:
    - name: Install iptables
      apt:
        name: iptables
Once installed, we can configure iptables using the following tasks. It is purposely written in the way duplicate rules are not written (thanks JetBrains Assistant for that):
    - name: Ensure POSTROUTING MASQUERADE rule exists in iptables
      ansible.builtin.shell: |
        iptables -t nat -C POSTROUTING -o wlan0 -j MASQUERADE || iptables -t nat -A POSTROUTING -o wlan0 -j MASQUERADE

    - name: Ensure FORWARD RELATED,ESTABLISHED rule exists in iptables
      ansible.builtin.shell: |
        iptables -C FORWARD -i wlan0 -o eth0 -m state --state RELATED,ESTABLISHED -j ACCEPT || iptables -A FORWARD -i wlan0 -o eth0 -m state --state RELATED,ESTABLISHED -j ACCEPT

    - name: Ensure FORWARD ACCEPT rule from eth0 to wlan0 exists in iptables
      ansible.builtin.shell: |
        iptables -C FORWARD -i eth0 -o wlan0 -j ACCEPT || iptables -A FORWARD -i eth0 -o wlan0 -j ACCEPT
iptables -t nat -A POSTROUTING -o wlan0 -j MASQUERADE - Ensures outgoing packets from private networks are NAT-translated (masqueraded).
iptables -A FORWARD -i wlan0 -o eth0 -m state --state RELATED,ESTABLISHED -j ACCEPT - Allows return traffic for already established or related connections.
iptables -A FORWARD -i eth0 -o wlan0 -j ACCEPT - Enables new outgoing traffic from the private network to the public network.
The tricky part about iptables is that they are not preserved automatically, so a few more tasks should be added:
    - name: Persist iptables rules
      ansible.builtin.shell:
        cmd: iptables-save > /etc/iptables.ipv4.nat

    - name: Write script to /etc/rc.local
      ansible.builtin.copy:
        dest: /etc/rc.local
        content: |
          #!/bin/bash
          _IP=$(hostname -I) || true
          if [ "$_IP" ]; then
            printf "My IP address is %s\n" "$_IP"
          fi

          iptables-restore < /etc/iptables.ipv4.nat

          exit 0
        owner: root
        group: root
        mode: '0755'
This ensures that iptables will be set up correctly after reboot.
Balthasar and Melchior
As we are done setting up DHCP and NAT on Caspar, it is time to connect the remaining two nodes and validate if everything is in order.

Once Balthasar is up, let’s SSH into it and see if we can connect to the internet.
$ ifconfig
eth0: flags=4163<UP,BROADCAST,RUNNING,MULTICAST>  mtu 1500
        inet 10.3.50.10  netmask 255.255.255.0  broadcast 10.3.50.255
        inet6 fe80::88fe:b645:43e8:aa83  prefixlen 64  scopeid 0x20<link>
        ether e4:5f:01:fc:aa:29  txqueuelen 1000  (Ethernet)
        RX packets 273  bytes 39557 (38.6 KiB)
        RX errors 0  dropped 0  overruns 0  frame 0
        TX packets 280  bytes 35241 (34.4 KiB)
        TX errors 0  dropped 0 overruns 0  carrier 0  collisions 0
...
It seems that we got an IP from Caspar for eth0. So the DHCP part works correctly.
Can we ping 8.8.8.8?
$ ping -c 4 8.8.8.8
PING 8.8.8.8 (8.8.8.8) 56(84) bytes of data.
--- 8.8.8.8 ping statistics ---
4 packets transmitted, 0 received, 100% packet loss, time 3060ms
Uh-oh, we cannot. Strange. We have followed the guide as thorough we could. Can we at least ping Caspar?
$ ping -c 4 10.3.50.1
PING 10.3.50.1 (10.3.50.1) 56(84) bytes of data.

--- 10.3.50.1 ping statistics ---
4 packets transmitted, 0 received, 100% packet loss, time 3061ms
Hmmm, something is not right. I can see some network activity on switch when I try to perform ping command.
*double checks iptables*
*double checks that net.ipv4.ip_forward=1*
*googles*
*googles*
*googles*
While taking to AI assistant about possible causes, I have noticed that phrase ip route is mentioned a few times. So I have asked,
Do I need ip route if I set iptables? and response was:
Even though your iptables rules allow forwarding packets between interfaces and perform NAT (masquerading) on outgoing traffic, the routing table must explicitly define the path for the packets to reach their destination. Here’s why you needed to add the ip route command.
Maybe the traffic originating from this network is not handled properly because the router does not understand it?
Let’s check ip routes:
$ ip routes
default via 192.168.0.1 dev wlan0 proto dhcp src 192.168.0.202 metric 600
192.168.0.0/24 dev wlan0 proto kernel scope link src 192.168.0.202 metric 600
Hmm, strange. What if we create a route specifically for the internal network originating from eht0 interface?
$ ip route add 10.3.50.0/24 dev eth0 proto static
Now let’s try to a ping command again from Balthasar.
$ ping -c 4 10.3.50.1
PING 10.3.50.1 (10.3.50.1) 56(84) bytes of data.
64 bytes from 10.3.50.1: icmp_seq=1 ttl=64 time=0.361 ms
64 bytes from 10.3.50.1: icmp_seq=2 ttl=64 time=0.224 ms
64 bytes from 10.3.50.1: icmp_seq=3 ttl=64 time=0.293 ms
64 bytes from 10.3.50.1: icmp_seq=4 ttl=64 time=0.209 ms

--- 10.3.50.1 ping statistics ---
4 packets transmitted, 4 received, 0% packet loss, time 3056ms
rtt min/avg/max/mdev = 0.209/0.271/0.361/0.060 ms

$ ping -c 4 8.8.8.8
PING 8.8.8.8 (8.8.8.8) 56(84) bytes of data.
64 bytes from 8.8.8.8: icmp_seq=1 ttl=56 time=17.5 ms
64 bytes from 8.8.8.8: icmp_seq=2 ttl=56 time=18.0 ms
64 bytes from 8.8.8.8: icmp_seq=3 ttl=56 time=13.8 ms
64 bytes from 8.8.8.8: icmp_seq=4 ttl=56 time=16.8 ms

--- 8.8.8.8 ping statistics ---
4 packets transmitted, 4 received, 0% packet loss, time 3005ms
rtt min/avg/max/mdev = 13.763/16.523/18.013/1.653 ms
It works!
Ip routes are also not preserved between restarts. Based on some internet suggestions, I have decided to set up a service to ensure this route is present on Caspar.
- name: Create the IP route check script
  ansible.builtin.copy:
    dest: /usr/local/bin/check_ip_route.sh
    content: |
      #!/bin/bash

      # Define the route to check
      TARGET_ROUTE="10.3.50.0/24 dev eth0 proto static"

      # Check if the route already exists
      if ! ip route show | grep -q "$TARGET_ROUTE"; then
          # Route does not exist, add it
          ip route add 10.3.50.0/24 dev eth0 proto static
          echo "Route added: $TARGET_ROUTE"
      else
          echo "Route already exists: $TARGET_ROUTE"
      fi
    mode: '0755'  # Set correct permissions for the script
    owner: root
    group: root

- name: Create the systemd service file
  ansible.builtin.copy:
    dest: /etc/systemd/system/check-ip-route.service
    content: |
      [Unit]
      Description=Check and Add IP Route
      After=network.target

      [Service]
      Type=oneshot
      ExecStart=/usr/local/bin/check_ip_route.sh
      RemainAfterExit=true
      User=root
      Group=root

      [Install]
      WantedBy=multi-user.target
    mode: '0644'
    owner: root
    group: root

- name: Reload systemd manager configuration
  become: true
  command: systemctl daemon-reload

- name: Enable the IP route service
  systemd:
    name: check-ip-route.service
    enabled: true
    state: started
End notes
Never be afraid to ask your AI assistant dumb questions :)